In my geometry class, we did a project that I thought was pretty cool. It's an art project, which is pretty ironic, due to the fact that it is still math class. Anyway, I thought it was pretty cook, and it looked like it enhanced my ability to copy a picture near perfectly. So, to start, you grab an image (usually about 10 centimeters in length and width), from the internet or any other source. Next, you take the image and draw a centimeter grid on top of the image, using the ruler. So, you will make 100 centimeter boxes (if the image is 10x10 centimeters). Now, take a sheet of paper, and draw a grid, but measure the grid the same way, but in inches, instead of centimeters. Lastly, you copy the image square by square, from the small image, to the large piece of paper. Erase the gridlines, and there you go! you have a enlargened version of the image. Don't forget to erase the gridlines after you are done, though!
Good luck!
Sunday, April 28, 2013
Friday, April 26, 2013
Taking a break
Sometimes, when I'm drawing, I realize that it doesn't look so good, or I'm not really having a good day, when it comes to drawing. I am sure we've all had those days, where it just seems like your skill just ran away from you or something. But, it's okay. The main thing that I do is just take a break from drawing. When you draw too much, or draw everyday, it becomes boring and all the fun just drains out of it. That pretty much defeats the whole purpose of drawing. Drawing is supposed to be a fun, leisurely activity; so if you are not enjoying it, then just take a break, and relax!
We've all have had one of those days before! Just be sure not to take too long of a break, because you're skill will drop, dramatically. (trust me, it happened to me numerous times).
We've all have had one of those days before! Just be sure not to take too long of a break, because you're skill will drop, dramatically. (trust me, it happened to me numerous times).
Blending colors
When you are coloring the hair, or anything else, it'd be boring to just shade something with one color, right? So what can you do? You should take a shade, and a tint of a color and try to blend NOT MIX, but blend them (for example, if you are using a blue, take out a light blue [or mix white and blue] and use it in places where light would appear, then take out a dark blue [or mix black and blue] and use it in places that the shadow of the area would appear). Finally, use the blues to blend, so what you should do is go from darkest to lightest with the different blues.
Hope this helps!
Hope this helps!
Sunday, April 21, 2013

900+ views!
thank you all for supporting me on my first blog, I appreciate the views, and I will do my best to keep up the site. please also give the blog a +1 if you like it. the button is to the right! lastly, I may be getting new supples to draw with. so I may post a couple on the site. (and no they aren't that bad). I'm improving little by little every day.


Friday, April 19, 2013
where to place the eyes
When drawing the head, it is important to make sure you have the eyes placed in the correct place. I know that In real life that everyone has different eyes and some people have have more space between eyes and some have less space. When you draw one eye it is important to space the eye a certain length, when drawing anime. The amount of space between should be able to fit another eye in it.
Hope this helps a little.
Hope this helps a little.
Monday, April 15, 2013
wrinkles vs no wrinkles
When you are drawing anime, some people think that anime is supposed to be unrealistic. Personally, I don't enjoy drawings that are not realistic. Usually, more life-like tend to catch my eye! Wouldn't you agree? So, when you're drawing anime, go for partially realistic. With that being said, you should put wrinkles in your clothing, when you draw it. When you draw wrinkles it makes the clothes look realistic, and that's basically what you are going for! When you are drawing wrinkles in clothing, you should place folds where they normally would go in real life. So, If bobby was folding his arms, the wrinkles in his clothing should be in his arm pits and inner forearm. Also, if bobby was wearing loose clothing, then gravity would pull the fabric down. When gravity pulls down his clothing, the wrinkles appear in a downward motion.
Bobby is just an example, by the way.
Good luck!
Bobby is just an example, by the way.
Good luck!
complementary colors!
When you are using certain colors to draw, have you ever thought of how to make the colors stand out? If you have, then I have an idea of what colors you could use, to make your drawing stand out. These colors are called complementary colors. You may have an idea of what these colors are because it was thought in elementary school, and occasionally in middle school. Complementary colors are two colors that "complement" each other. That's how it gets its name! To find these colors, you may use a color wheel.
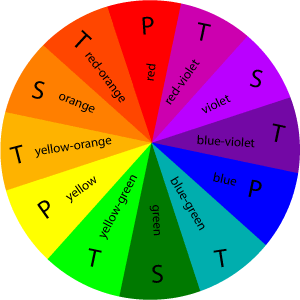
In the color wheel, the color that is directly across is the color's compliment. For example, blue and orange are complimentary colors.
If you use the complimentary colors, you can make the colors look balanced.
Good luck!

In the color wheel, the color that is directly across is the color's compliment. For example, blue and orange are complimentary colors.
If you use the complimentary colors, you can make the colors look balanced.
Good luck!
Sunday, April 7, 2013
Primary, Secondary, and Tertiary
When you are coloring, the main thing people do is use the primary and secondary colors to color. So I thought that it'd be nice to teach you what the colors are called, and how they are made. I also threw in tertiary. These are the basics. So enjoy!
primary = RED, YELLOW, BLUE
Secondary = ORANGE, PURPLE, GREEN
Tertiary= Colors like BLUE-GREEN, YELLOW-GREEN, RED-ORANGE,etc.
Primary colors make up all the colors on the color wheel. The color wheel should be below.
Secondary colors are colors that are made up of 2 primary colors on the color wheel.
Tertiary colors are colrs that are made up of 2 secondary colors.
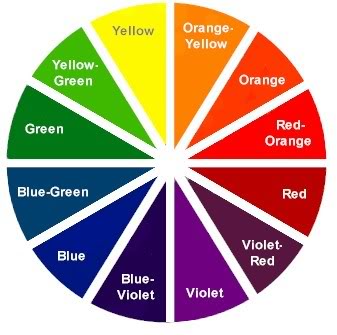 By using all primary (or secondary or tertiary) colors in a drawing, you can make a color scheme. Which gives a balanced effect on your drawing. Color schemes are important to the drawing (I will touch on that later in time).
By using all primary (or secondary or tertiary) colors in a drawing, you can make a color scheme. Which gives a balanced effect on your drawing. Color schemes are important to the drawing (I will touch on that later in time).
With time Comes Success!
I know you've all heard the saying "practice makes perfect". I am sure you all are thinking... You are here to lecture me, aren't you? Well, do you know what I would answer? Yes... Yes I am. Not really, though. I am simply straining the importance of actually putting in work to get a positive result in return. So, in conclusion, keep practicing, and you will improve for sure!
Good luck :)
Touching on the Basics!
Whenever you touch on the basics, you improve a little more. It doesn't hurt to just go back and look at the basics of drawing an eye, or looking up how to draw a head. Just by looking at your old drawings, you can improve a lot. How, you say? Just by correcting some things that you think you may have done wrong. For example, whenever I draw a picture of someone at a close-up view,I always draw the hands too small. Just by remembering this, while drawing the next picture, I can change up the sizing to make it look better. No matter how good you may think your drawing is, there is 99% of the time something wrong with it or something you might want to change next time.
Good luck!
Monday, April 1, 2013
3D vs 2D drawing
When you are drawing, it is best to use three dimensions, because it gives the picture a lifelike feeling. If it is two dimensional, it makes it seem boring, and dead. That is precicely the opposite of what you want, right? How do you get this effect, some may ask? Well, the best thing you can do is learn to shade. Shading gives the effect of depth, and space. When you learn to efficiently shade, your drawings will look more life-like.
So, good luck!
Drawing backgrounds
The last thing you want to have when drawing a completely awesome picture, is having a blank background. It's boring, and non-unique. So add a background to give your character a lifelike feeling. When you are designing a background, you need to make it seem realistic. For example, a beach background will probably have a nice ocean view, sand and maybe an umbrella. Some birds and beach balls in the background will make it seem more realistic, as well. When you start creating backgrounds you should observe real life sceneries. Maybe your back yard, or a playground.
Good luck, and remember, practice makes perfect!
Subscribe to:
Posts (Atom)